Application Example - Photo OCR
Optical Character Recognition (OCR) enables computers to interpret text within images. This process involves a machine learning pipeline comprising several steps, each focused on a specific aspect of OCR, like pedestrian or text detection. The pipeline integrates various techniques, including data synthesis, to enhance the accuracy and reliability of character recognition.
Detailed Mathematical and Technical Aspects
I. Machine Learning Pipeline in OCR:
- Systematic Approach: A machine learning pipeline is a systematic approach involving sequential steps for solving complex problems. It ensures that each phase of the process contributes to the overall goal of accurate text recognition.
- Pipeline Components: In OCR, this pipeline includes the generation of training datasets, classifier training, and the application of these classifiers to new data.
II. Training Data and Classifier Development:
- Dataset Creation: Develop a training dataset comprising positive (text) and negative (non-text) image examples. This dataset forms the foundation for training robust classifiers.
- Classifier Training: Train a classifier using this dataset. The classifier learns to differentiate between text and non-text image patches, forming the basis for accurate text detection.
III. Sliding Window Technique:
- Implementation: Implement a sliding window technique to apply the classifier across different sections of an image. This involves moving a window across the image, classifying each patch as text or non-text.
- Efficiency: This method ensures that all parts of the image are examined systematically, increasing the chances of detecting text accurately.
IV. Character Recognition:
- Focus on Characters: After detecting text regions, the focus shifts to recognizing individual characters within these regions.
- Specialized Training Set: Use a specialized training set of character images, which enhances the classifier’s ability to recognize different characters accurately.
- Data Synthesis: Employ data synthesis, such as introducing distortions to character images, to enhance training data variability. This process makes the model more robust to variations in real-world data.
Problem Description and Pipeline
Understanding the Photo OCR Problem
- Challenge: The primary challenge is teaching computers to interpret text in digital images efficiently and accurately.
- Complexity: This involves dealing with variations in text appearance, such as different fonts, sizes, orientations, and background noise.
The Pipeline Structure
- Modular Approach: Photo OCR involves a sequence of distinct modules, each handling a part of the process. These modules may include machine learning algorithms and data processing steps, each contributing to the overall goal of accurate text recognition.

Here's a mock Python code demonstrating a pipeline for OCR (Optical Character Recognition) tasks, including image preprocessing, text detection, segmentation, and character recognition.
# Step 1: Import necessary libraries
import cv2
import pytesseract
from skimage.segmentation import clear_border
from skimage.measure import label, regionprops
import matplotlib.pyplot as plt

# Step 2: Load and preprocess the image
def load_preprocess_image(filepath):
    # Load the image
    image = cv2.imread(filepath, cv2.IMREAD_GRAYSCALE)

    # Preprocess the image (e.g., thresholding)
    _, processed_image = cv2.threshold(image, 128, 255, cv2.THRESH_BINARY_INV + cv2.THRESH_OTSU)
    return processed_image

# Step 3: Text detection
def detect_text(image):
    # Use pytesseract to detect text
    text_boxes = pytesseract.image_to_boxes(image)
    return text_boxes

# Step 4: Text segmentation
def segment_text(image):
    # Clear the borders and label the image
    cleared = clear_border(image)
    label_image = label(cleared)

    # Extract regions (potential characters)
    regions = regionprops(label_image)
    return regions

# Step 5: Character recognition
def recognize_characters(image, regions):
    characters = []
    for region in regions:
        # Extract each character
        minr, minc, maxr, maxc = region.bbox
        char_image = image[minr:maxr, minc:maxc]

        # Recognize the character using pytesseract
        char_text = pytesseract.image_to_string(char_image, config='--psm 10')
        characters.append(char_text)
    return characters

# Step 6: Visualize results
def visualize_results(image, text_boxes, characters):
    # Plot the original image with detected text boxes
    plt.imshow(image, cmap='gray')
    for box, char in zip(text_boxes.splitlines(), characters):
        b = box.split(' ')
        x, y, w, h = int(b[1]), int(b[2]), int(b[3]), int(b[4])
        cv2.rectangle(image, (x, h), (w, y), (0, 255, 0), 2)
        plt.text(x, y, char, color='red', fontsize=12)
    plt.show()

# Main function to execute the OCR pipeline
def main(filepath):
    image = load_preprocess_image(filepath)
    text_boxes = detect_text(image)
    regions = segment_text(image)
    characters = recognize_characters(image, regions)
    visualize_results(image, text_boxes, characters)

# Execute the OCR pipeline
if __name__ == "__main__":
    filepath = 'path_to_your_image_file.png'
    main(filepath)
You can customize each step based on your specific OCR requirements and data.
Pedestrian Detection (Analogous Example)
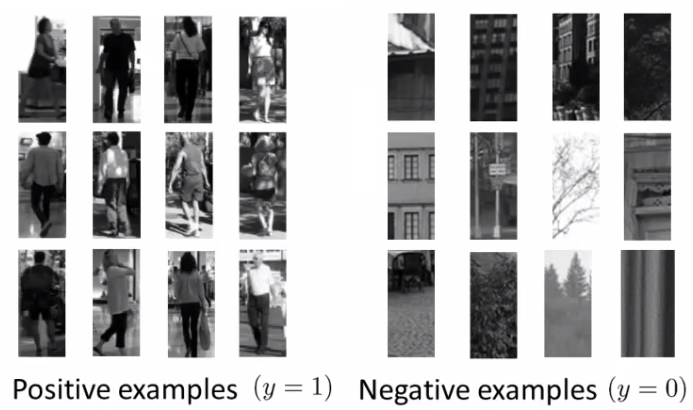
Training Data Collection
- Positive and Negative Examples: Collect a set of images containing pedestrians (positive examples) and images without them (negative examples). This data forms the basis for training the pedestrian detection model.
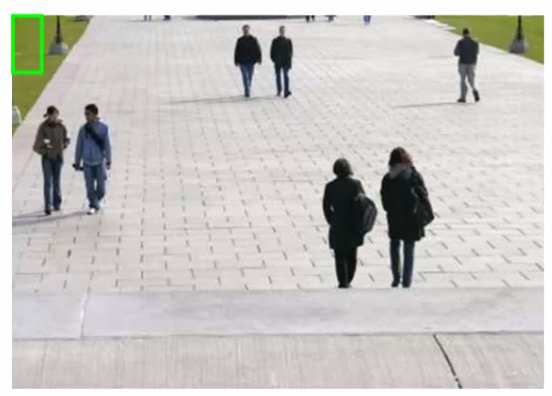
Classifier Application
- Standard Human Aspect Ratio: Apply the trained classifier on a new image using a standard human aspect ratio patch (e.g., 82 x 36 pixels). This step involves moving the patch across the image to detect pedestrians.
- Iterative Process: Iterate this process across the entire image, adjusting the patch position and size to ensure comprehensive pedestrian detection.
Here is a mock Python code demonstrating the application of a trained classifier to detect pedestrians using a standard human aspect ratio patch (82 x 36 pixels). The code will iterate over the entire image, adjusting the patch position and size to ensure comprehensive detection.
import cv2
import numpy as np
from sklearn.externals import joblib

# Load the trained classifier
def load_classifier(model_path):
    classifier = joblib.load(model_path)
    return classifier

# Function to slide window across the image
def sliding_window(image, step_size, window_size):
    for y in range(0, image.shape[0] - window_size[1], step_size):
        for x in range(0, image.shape[1] - window_size[0], step_size):
            yield (x, y, image[y:y + window_size[1], x:x + window_size[0]])

# Function to resize the image
def resize_image(image, scale_percent):
    width = int(image.shape[1] * scale_percent / 100)
    height = int(image.shape[0] * scale_percent / 100)
    dim = (width, height)
    resized = cv2.resize(image, dim, interpolation = cv2.INTER_AREA)
    return resized

# Apply classifier on each patch
def apply_classifier(image, classifier):
    window_size = (82, 36)  # Standard human aspect ratio patch
    step_size = 10  # Step size for moving the patch
    detections = []

    # Iterate over multiple scales
    for scale in range(10, 110, 10):
        resized_image = resize_image(image, scale)
        for (x, y, window) in sliding_window(resized_image, step_size, window_size):
            if window.shape[0] != window_size[1] or window.shape[1] != window_size[0]:
                continue

            # Feature extraction (example using HOG)
            hog = cv2.HOGDescriptor()
            features = hog.compute(window).reshape(1, -1)

            # Predict using the classifier
            prediction = classifier.predict(features)

            if prediction == 1:  # Assuming 1 indicates pedestrian
                detections.append((x, y, x + window_size[0], y + window_size[1], scale))

    return detections

# Draw detections on the image
def draw_detections(image, detections):
    for (x1, y1, x2, y2, scale) in detections:
        cv2.rectangle(image, (x1, y1), (x2, y2), (0, 255, 0), 2)
    cv2.imshow('Detections', image)
    cv2.waitKey(0)
    cv2.destroyAllWindows()

# Main function to execute the detection pipeline
def main(image_path, model_path):
    image = cv2.imread(image_path)
    classifier = load_classifier(model_path)
    detections = apply_classifier(image, classifier)
    draw_detections(image, detections)

# Execute the detection pipeline
if __name__ == "__main__":
    image_path = 'path_to_your_image_file.jpg'
    model_path = 'path_to_your_trained_model.pkl'
    main(image_path, model_path)
The classifier should be trained beforehand and saved as a .pkl file. The sliding window and resizing steps ensure that pedestrians of different sizes are detected across the entire image.
Text Detection in Images
Training and Classifier Deployment
- Training Set: Similar to pedestrian detection, prepare a training set with examples of text and non-text. This dataset is crucial for training the text detection model.
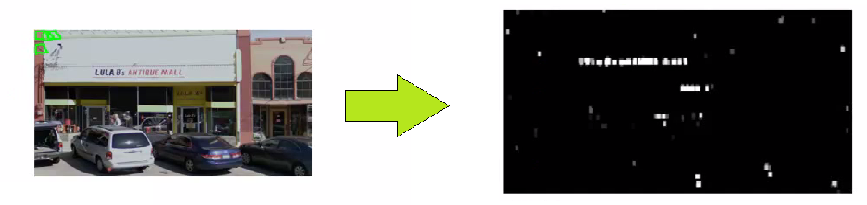
- Predefined Window: Apply a trained classifier to an image using a predefined rectangular window, systematically scanning the image for potential text regions.
Here is a mock Python code demonstrating the process of training a text detection classifier.
# Mock Python Code for Training a Text Detection Classifier

import cv2
import numpy as np
from sklearn.ensemble import RandomForestClassifier
from sklearn.feature_extraction.text import CountVectorizer
from sklearn.externals import joblib

# Function to extract features from images
def extract_features(image):
    # Example: Using Histogram of Oriented Gradients (HOG)
    hog = cv2.HOGDescriptor()
    features = hog.compute(image)
    return features.flatten()

# Load and prepare the training dataset
def prepare_training_set(pos_image_paths, neg_image_paths):
    X = []
    y = []

    # Load positive samples (text images)
    for path in pos_image_paths:
        image = cv2.imread(path, cv2.IMREAD_GRAYSCALE)
        features = extract_features(image)
        X.append(features)
        y.append(1)  # Label for text

    # Load negative samples (non-text images)
    for path in neg_image_paths:
        image = cv2.imread(path, cv2.IMREAD_GRAYSCALE)
        features = extract_features(image)
        X.append(features)
        y.append(0)  # Label for non-text

    return np.array(X), np.array(y)

# Train the classifier
def train_classifier(X, y):
    classifier = RandomForestClassifier(n_estimators=100, random_state=42)
    classifier.fit(X, y)
    return classifier

# Main function for training
def main_train(pos_image_paths, neg_image_paths, model_path):
    X, y = prepare_training_set(pos_image_paths, neg_image_paths)
    classifier = train_classifier(X, y)
    joblib.dump(classifier, model_path)

# Execute the training
if __name__ == "__main__":
    pos_image_paths = ['path_to_positive_image1.jpg', 'path_to_positive_image2.jpg']  # Add all paths
    neg_image_paths = ['path_to_negative_image1.jpg', 'path_to_negative_image2.jpg']  # Add all paths
    model_path = 'path_to_save_trained_model.pkl'
    main_train(pos_image_paths, neg_image_paths, model_path)
Region Identification
- Confidence Levels: The classifier outputs varying confidence levels, represented by shades of gray, indicating the likelihood of text presence. Higher confidence levels indicate a higher likelihood of text presence.
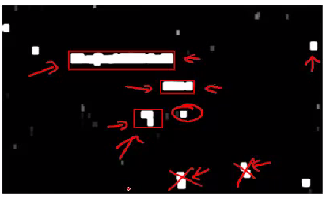
- Expansion Algorithm: Use an expansion algorithm to identify and enlarge potential text regions. This involves merging nearby regions and eliminating improbable ones based on size or aspect ratio.
Here is a mock Python code demonstrating region identification for text detection. This includes handling classifier confidence levels and applying an expansion algorithm to identify and enlarge potential text regions.
import cv2
import numpy as np
from sklearn.externals import joblib
from skimage.measure import label, regionprops

# Load the trained classifier
def load_classifier(model_path):
    classifier = joblib.load(model_path)
    return classifier

# Function to slide window across the image and obtain confidence levels
def sliding_window_confidence(image, step_size, window_size, classifier):
    confidence_map = np.zeros((image.shape[0], image.shape[1]), dtype=np.float32)

    for y in range(0, image.shape[0] - window_size[1], step_size):
        for x in range(0, image.shape[1] - window_size[0], step_size):
            window = image[y:y + window_size[1], x:x + window_size[0]]
            if window.shape[0] != window_size[1] or window.shape[1] != window_size[0]:
                continue

            # Feature extraction (example using HOG)
            hog = cv2.HOGDescriptor()
            features = hog.compute(window).reshape(1, -1)

            # Predict confidence using the classifier
            confidence = classifier.predict_proba(features)[0][1]  # Confidence for text class

            # Assign confidence to the confidence map
            confidence_map[y:y + window_size[1], x:x + window_size[0]] = confidence

    return confidence_map

# Function to apply expansion algorithm
def expand_regions(confidence_map, threshold):
    # Threshold the confidence map to create a binary mask
    binary_map = (confidence_map > threshold).astype(np.uint8)

    # Label connected components
    labeled_map = label(binary_map)

    # Initialize a list to store bounding boxes of text regions
    text_regions = []

    # Iterate over detected regions
    for region in regionprops(labeled_map):
        # Get the bounding box of the region
        min_row, min_col, max_row, max_col = region.bbox

        # Filter out improbable regions based on size or aspect ratio
        region_height = max_row - min_row
        region_width = max_col - min_col
        aspect_ratio = region_width / region_height

        if region_height > 5 and region_width > 5 and 0.2 < aspect_ratio < 5:
            text_regions.append((min_col, min_row, max_col, max_row))

    return text_regions

# Draw text regions on the image
def draw_text_regions(image, text_regions):
    for (x1, y1, x2, y2) in text_regions:
        cv2.rectangle(image, (x1, y1), (x2, y2), (0, 255, 0), 2)
    cv2.imshow('Text Regions', image)
    cv2.waitKey(0)
    cv2.destroyAllWindows()

# Main function to execute the region identification
def main_region_identification(image_path, model_path, confidence_threshold):
    image = cv2.imread(image_path, cv2.IMREAD_GRAYSCALE)
    classifier = load_classifier(model_path)
    window_size = (82, 36)  # Predefined window size for text detection
    step_size = 10  # Step size for moving the window

    # Obtain confidence map
    confidence_map = sliding_window_confidence(image, step_size, window_size, classifier)

    # Apply expansion algorithm to identify text regions
    text_regions = expand_regions(confidence_map, confidence_threshold)

    # Draw identified text regions on the image
    draw_text_regions(image, text_regions)

# Execute the region identification pipeline
if __name__ == "__main__":
    image_path = 'path_to_your_image_file.jpg'
    model_path = 'path_to_your_trained_model.pkl'
    confidence_threshold = 0.5  # Set a threshold for text confidence
    main_region_identification(image_path, model_path, confidence_threshold)
The classifier should be trained beforehand and saved as a .pkl file. The confidence map visualizes the classifier's confidence in detecting text, and the expansion algorithm merges and filters regions to identify potential text areas.
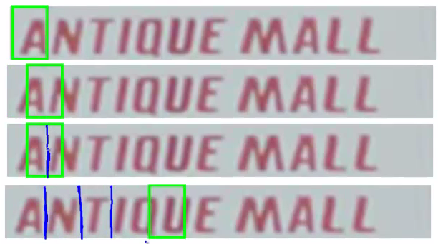
Character Segmentation
1D Sliding Window Approach
- Sliding Window: Slide a one-dimensional window along identified text areas. This technique helps in segmenting the text into individual characters.
- Character Separation: Determine if each window segment represents a potential character separation. Insert divisions between characters when appropriate to ensure accurate segmentation.
Here's a mock Python code for a 1D sliding window approach to segment text into individual characters. This involves sliding a one-dimensional window along identified text areas and determining character separation.
import cv2
import numpy as np
import matplotlib.pyplot as plt

# Function to preprocess the text area
def preprocess_text_area(text_area):
    # Convert to binary image (thresholding)
    _, binary_image = cv2.threshold(text_area, 128, 255, cv2.THRESH_BINARY_INV + cv2.THRESH_OTSU)
    return binary_image

# Function to perform 1D sliding window for character segmentation
def sliding_window_1d(text_area, window_width):
    height, width = text_area.shape
    character_separations = []

    # Sum pixel values vertically to get a 1D projection profile
    vertical_projection = np.sum(text_area, axis=0)

    for x in range(0, width - window_width + 1):
        window_sum = np.sum(vertical_projection[x:x + window_width])
        if window_sum == 0:
            character_separations.append(x + window_width // 2)

    return character_separations

# Function to draw character separations on the image
def draw_character_separations(text_area, character_separations):
    output_image = cv2.cvtColor(text_area, cv2.COLOR_GRAY2BGR)
    for x in character_separations:
        cv2.line(output_image, (x, 0), (x, output_image.shape[0]), (0, 0, 255), 2)
    return output_image

# Main function for character segmentation
def main_character_segmentation(image_path, text_bounding_box):
    # Load the image and extract the text area
    image = cv2.imread(image_path, cv2.IMREAD_GRAYSCALE)
    x1, y1, x2, y2 = text_bounding_box
    text_area = image[y1:y2, x1:x2]

    # Preprocess the text area
    preprocessed_text_area = preprocess_text_area(text_area)

    # Perform 1D sliding window for character segmentation
    window_width = 3  # Width of the sliding window
    character_separations = sliding_window_1d(preprocessed_text_area, window_width)

    # Draw character separations on the text area
    segmented_image = draw_character_separations(preprocessed_text_area, character_separations)

    # Display the result
    plt.imshow(segmented_image)
    plt.title('Character Segmentation')
    plt.show()

# Execute the character segmentation pipeline
if __name__ == "__main__":
    image_path = 'path_to_your_image_file.jpg'
    text_bounding_box = (50, 100, 300, 150)  # Example bounding box coordinates (x1, y1, x2, y2)
    main_character_segmentation(image_path, text_bounding_box)
The code assumes a predefined bounding box (text_bounding_box) for the text area within the image. The sliding_window_1d function identifies potential character boundaries based on the vertical projection profile of the text area, and the separations are visualized by drawing red lines on the image.
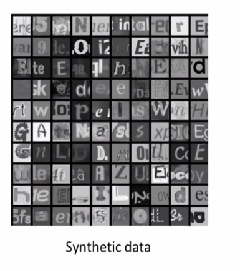
Character Recognition through Data Synthesis
Training Data Enhancement
- Grayscale Images: To recognize characters from image patches, consider using grayscale images for simplicity. This reduces the complexity of the recognition process.
- Vast Training Set: Generate a vast training set by using characters from various fonts and placing them on random backgrounds. This enhances the model’s ability to recognize characters in different contexts.
- Distortion Introduction: Introduce distortions to existing data for a more robust training process. This makes the model more resilient to variations in character appearance.
Below is a mock Python code for training data enhancement for character recognition. This includes using grayscale images, generating a vast training set with various fonts and random backgrounds, and introducing distortions to make the model more robust.
import cv2
import numpy as np
from PIL import Image, ImageDraw, ImageFont
import random
import os

# Function to generate random backgrounds
def generate_random_background(width, height):
    background = np.random.randint(0, 256, (height, width), dtype=np.uint8)
    return background

# Function to overlay text on random background
def overlay_text_on_background(text, font_path, font_size, background):
    height, width = background.shape
    image = Image.fromarray(background)
    draw = ImageDraw.Draw(image)
    font = ImageFont.truetype(font_path, font_size)
    text_width, text_height = draw.textsize(text, font=font)
    position = ((width - text_width) // 2, (height - text_height) // 2)
    draw.text(position, text, font=font, fill=(255,))
    return np.array(image)

# Function to introduce distortions
def introduce_distortions(image):
    # Example distortions: rotation, scaling, and noise
    rows, cols = image.shape

    # Rotation
    angle = random.uniform(-10, 10)
    M = cv2.getRotationMatrix2D((cols / 2, rows / 2), angle, 1)
    rotated = cv2.warpAffine(image, M, (cols, rows))

    # Scaling
    scale = random.uniform(0.9, 1.1)
    scaled = cv2.resize(rotated, None, fx=scale, fy=scale, interpolation=cv2.INTER_LINEAR)

    # Adding noise
    noise = np.random.randint(0, 50, (rows, cols), dtype=np.uint8)
    noisy_image = cv2.add(scaled, noise)

    return noisy_image

# Function to create training data
def create_training_data(characters, font_paths, num_samples_per_char, image_size):
    X = []
    y = []

    for char in characters:
        for font_path in font_paths:
            for _ in range(num_samples_per_char):
                # Generate random background
                background = generate_random_background(image_size, image_size)

                # Overlay text on background
                font_size = random.randint(20, 40)
                char_image = overlay_text_on_background(char, font_path, font_size, background)

                # Convert to grayscale
                gray_image = cv2.cvtColor(char_image, cv2.COLOR_BGR2GRAY)

                # Introduce distortions
                distorted_image = introduce_distortions(gray_image)

                # Append to dataset
                X.append(distorted_image)
                y.append(char)

    return np.array(X), np.array(y)

# Save the generated images for visualization
def save_generated_images(X, y, output_dir):
    if not os.path.exists(output_dir):
        os.makedirs(output_dir)
    for i, (image, label) in enumerate(zip(X, y)):
        output_path = os.path.join(output_dir, f'{label}_{i}.png')
        cv2.imwrite(output_path, image)

# Main function to create and save the training dataset
def main_training_data_enhancement(characters, font_paths, num_samples_per_char, image_size, output_dir):
    X, y = create_training_data(characters, font_paths, num_samples_per_char, image_size)
    save_generated_images(X, y, output_dir)

# Execute the training data enhancement
if __name__ == "__main__":
    characters = 'ABCDEFGHIJKLMNOPQRSTUVWXYZabcdefghijklmnopqrstuvwxyz0123456789'
    font_paths = ['path_to_font1.ttf', 'path_to_font2.ttf']  # Add paths to different font files
    num_samples_per_char = 100  # Number of samples per character
    image_size = 64  # Size of the generated image (64x64 pixels)
    output_dir = 'path_to_output_directory'
    main_training_data_enhancement(characters, font_paths, num_samples_per_char, image_size, output_dir)
By using different fonts and random backgrounds, the model can learn to recognize characters in various contexts, making it more robust and effective in real-world scenarios.
Reference
These notes are based on the free video lectures offered by Stanford University, led by Professor Andrew Ng. These lectures are part of the renowned Machine Learning course available on Coursera. For more information and to access the full course, visit the Coursera course page.